
I’ll never forget the first time I made chicken tenders in my air fryer. It was one of those chaotic weeknight evenings when my kids were hangry, I had approximately seven minutes to get dinner on the table, and my usual go-to frozen nuggets were nowhere to be found. In desperation, I grabbed some chicken breast from the fridge and thought, “How hard could it be?”
Forty-five minutes later, my family was practically licking their plates clean, and I was standing in my kitchen wondering why I’d been making chicken tenders the hard way for so many years. These air fryer chicken tenders aren’t just convenient – they’re genuinely better than anything you’ll get from a restaurant. They’re crispy on the outside, impossibly juicy on the inside, and require minimal cleanup. Trust me when I say this recipe will become your new weeknight superhero.
What makes this recipe special is the perfect balance of simplicity and flavor. You don’t need fancy ingredients or complicated techniques – just a few pantry staples and about 30 minutes from start to finish. Whether you’re feeding picky eaters, meal prepping for the week, or just craving some seriously good comfort food, these tenders deliver every single time.
Table of Contents
Why These Air Fryer Chicken Tenders Are Absolutely Perfect
Let’s talk about what makes these crispy air fryer chicken tenders stand out from the crowd. First, the coating stays put – no sad, soggy breading falling off halfway through cooking. The secret is in the double-dip method I’ll share with you, which creates an almost armor-like crust that protects the chicken while it cooks.
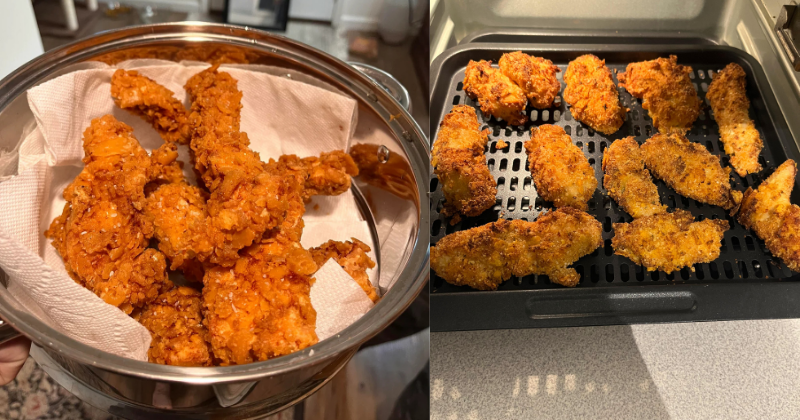
The air fryer works its magic by circulating hot air around the chicken, creating that coveted golden-brown exterior without requiring cups of oil. You get all the satisfaction of deep-fried chicken tenders with a fraction of the mess and calories. Plus, they cook in just 12-15 minutes, making them perfect for those “what’s for dinner?” panic moments we all have.
This recipe hits that sweet spot of being simple enough for beginners but impressive enough to serve to company. The difficulty level is honestly a 2 out of 10 – if you can dip chicken in flour and press a few buttons, you’ve got this. From prep to plate, you’re looking at about 30 minutes total, with most of that being hands-off cooking time.
Ingredients You’ll Need
For the Chicken:
- 1.5 lbs boneless, skinless chicken breasts, cut into tender-sized strips
- 1 cup all-purpose flour
- 2 large eggs, beaten
- 1.5 cups panko breadcrumbs
- 1/2 cup regular breadcrumbs
- 1 teaspoon garlic powder
- 1 teaspoon onion powder
- 1 teaspoon paprika
- 1/2 teaspoon dried oregano
- 1 teaspoon salt
- 1/2 teaspoon black pepper
- 1/4 teaspoon cayenne pepper (optional, for a little kick)
- Cooking spray or olive oil spray
Serves: 4-6 people (or 2 very hungry teenagers)
Pro tip: The combination of panko and regular breadcrumbs is crucial here. Panko gives you that extra crunch, while regular breadcrumbs help everything stick together beautifully. Don’t skip this step!
Ingredient substitutions: You can use chicken thighs if you prefer (they’re more forgiving and stay extra juicy), and feel free to experiment with the seasonings. Italian seasoning works wonderfully in place of oregano, and smoked paprika adds an incredible depth of flavor.
 (800 x 420 px)")
Step-by-Step Cooking Instructions
Step 1: Prep Your Chicken Like a Pro
Start by cutting your chicken breasts into strips about 1 inch wide and 3-4 inches long. Here’s where I learned something game-changing: cut against the grain for the most tender results. The chicken strips should be roughly the same size so they cook evenly – nobody wants some pieces overcooked while others are still pink in the middle.
Pat the chicken completely dry with paper towels. This might seem like an unnecessary step, but trust me on this one. Moisture is the enemy of crispy coating, and taking an extra minute here will pay off big time when you bite into that perfect crunch later.
Step 2: Set Up Your Breading Station
This is where organization saves the day. Set up three shallow dishes: flour in the first, beaten eggs in the second, and your breadcrumb mixture in the third.
For the breadcrumb mixture, combine the panko, regular breadcrumbs, garlic powder, onion powder, paprika, oregano, salt, pepper, and cayenne (if using). Mix everything thoroughly – I like to use a fork to really distribute those seasonings evenly.
Pro tip: Keep one hand for wet ingredients and one for dry. This prevents you from ending up with concrete mittens of breading stuck to your fingers!
Step 3: The Magic Double-Dip Method
Here’s the secret that makes these tenders absolutely foolproof: dredge each piece of chicken in flour first, shaking off the excess. Then dip it in the beaten egg, making sure it’s completely coated. Finally, press it firmly into the breadcrumb mixture, really packing those crumbs on there.
This three-step process creates layers that lock in moisture while building up that incredible crust. Don’t rush this part – each piece should look like it’s wearing a cozy breadcrumb sweater when you’re done.
Place the breaded tenders on a plate and let them rest for about 5 minutes while your air fryer preheats. This little rest period helps the coating set up and stick even better during cooking.
Step 4: Air Fryer Magic Time
Preheat your air fryer to 400°F (200°C) for about 3 minutes. Lightly spray the basket with cooking spray – this prevents sticking and helps with that golden color we’re after.
Place the chicken tenders in the air fryer basket in a single layer, making sure they’re not touching. Depending on your air fryer size, you might need to cook them in batches. Don’t be tempted to overcrowd – good things come to those who wait!
Spray the tops of the tenders lightly with cooking spray. This helps the top surface get beautifully golden and crispy.
Step 5: Cook to Crispy Perfection
Cook for 6 minutes, then flip the tenders and spray the newly exposed side. Cook for another 6-9 minutes, depending on the thickness of your chicken. You’re looking for an internal temperature of 165°F (74°C) and a gorgeous golden-brown color.
Don’t worry if some pieces cook faster than others – just remove the done ones and let the others finish up. The beauty of air frying is that you can easily adjust cooking times for different sized pieces.
The tenders are done when they’re golden brown and crispy on the outside, and when you cut into the thickest piece, the juices run clear. If you have a meat thermometer, use it – there’s no shame in being sure!
Chef’s Tips & Variations That’ll Make You Look Like a Pro
Storage secrets: These chicken tenders keep beautifully in the refrigerator for up to 3 days. Store them in an airtight container, and when you’re ready to reheat, pop them back in the air fryer at 350°F for 2-3 minutes. They’ll crisp right back up like magic!
Flavor variations I love: Try adding 2 tablespoons of grated Parmesan cheese to your breadcrumb mixture for an Italian twist. Or go Southern-style with a teaspoon of hot sauce mixed into your egg wash. For Asian-inspired tenders, add a tablespoon of sesame seeds and a teaspoon of ground ginger to the coating.
Make-ahead magic: You can bread these tenders up to 4 hours ahead and keep them covered in the refrigerator. This actually helps the coating stick even better! Just add an extra minute or two to the cooking time if you’re starting from cold.
Dipping sauce game: While these are absolutely delicious on their own, they’re incredible with honey mustard, ranch, buffalo sauce, or even a simple squeeze of lemon. My kids are obsessed with mixing ketchup and mayo for a “special sauce” that makes them feel very grown-up.
Pro tip for meal prep: Double this recipe and freeze half the cooked tenders in a freezer bag. They reheat beautifully straight from frozen – just add 2-3 extra minutes to the cooking time.
Perfect pairings: These tenders are amazing over a simple salad for a lighter meal, tucked into wraps with your favorite veggies, or served alongside sweet potato fries and steamed broccoli for a complete dinner that’ll make everyone happy.
The Perfect Finish to Your New Favorite Recipe
There’s something deeply satisfying about pulling a batch of these golden, crispy chicken tenders out of your air fryer and seeing your family’s faces light up. They’re the kind of recipe that makes you feel like you’ve got this whole cooking thing figured out, even on the days when everything else feels chaotic.
What I love most about this recipe is how it’s become our family’s go-to for so many occasions. Busy weeknights, lazy weekend lunches, even as an appetizer when friends come over – these tenders just work. They’re comfort food at its finest, but without the guilt or the mess of traditional frying.
So go ahead, give these yummy air fryer chicken tenders a try. I promise they’ll earn a permanent spot in your dinner rotation, and you’ll find yourself wondering how you ever lived without them. Your air fryer is about to become your new best friend, and your family is going to think you’re some kind of kitchen genius. You’ve got this – now get cooking!