
There’s something absolutely magical about a perfect lemon meringue pie – that glossy, towering meringue sitting proudly atop a silky lemon curd, all nestled in a buttery, flaky crust. I still remember the first time I attempted this dessert masterpiece in my grandmother’s kitchen. Let’s just say it was a disaster! The meringue wept, the curd was lumpy, and I nearly gave up on this classic altogether. But after years of practice (and plenty of mishaps), I’ve cracked the code to creating the most stunning, bakery-worthy lemon meringue pie right in your own kitchen.
This isn’t just any lemon meringue pie – this is the kind that makes people stop mid-conversation when you bring it to the table. The kind that has your family begging for the recipe and your neighbors “dropping by” around dessert time. Trust me, once you master this technique, you’ll become the designated dessert person at every gathering, and honestly? You’ll love every minute of it!
Table of Contents
What Makes This Lemon Meringue Pie Special
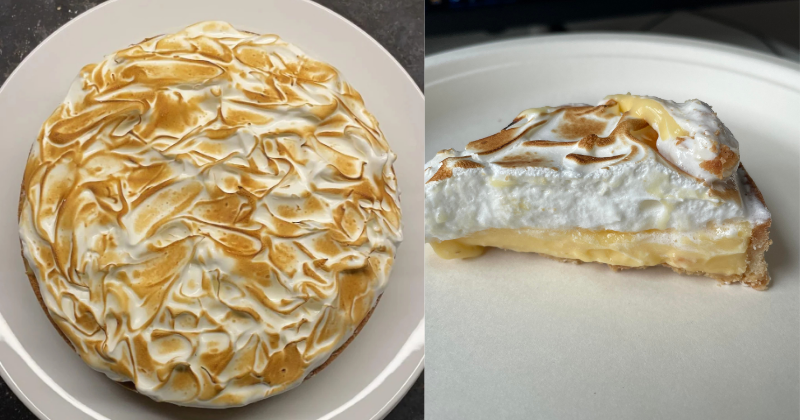
This lemon meringue pie strikes the perfect balance between tart and sweet, with each component working in beautiful harmony. The buttery pastry crust provides the ideal foundation – crisp enough to hold everything together but tender enough to cut through effortlessly. The lemon curd filling is intensely citrusy without being puckering, with a silky smooth texture that’s neither too thick nor too runny. And that cloud-like meringue? It’s stable, glossy, and golden-peaked perfection.
What sets this recipe apart is the attention to detail in each layer. We’re making everything from scratch, which might sound intimidating, but I promise it’s more forgiving than you think. The difficulty level is intermediate – perfect for someone who’s comfortable with basic baking but ready to tackle something a bit more impressive. Total time commitment is about 4 hours, including chilling time, but most of that is hands-off.
Ingredients
Serves 8-10 people
For the Pastry Crust:
- 1¼ cups all-purpose flour
- ½ teaspoon salt
- ⅓ cup cold unsalted butter, cubed
- 3-4 tablespoons ice water
For the Lemon Curd Filling:
- 6 large egg yolks (save those whites for the meringue!)
- ⅔ cup granulated sugar
- ⅓ cup fresh lemon juice (about 2-3 large lemons)
- 2 tablespoons lemon zest
- 3 tablespoons cornstarch
- 1¼ cups water
- 3 tablespoons unsalted butter
For the Meringue:
- 6 large egg whites (room temperature is key!)
- ¾ cup granulated sugar
- ¼ teaspoon cream of tartar
- 1 teaspoon vanilla extract
Pro tip: Always use fresh lemons for the best flavor – those little plastic lemon-shaped bottles just can’t compete with the real deal! And here’s a secret: roll your lemons on the counter while pressing down before juicing them. You’ll get way more juice out of each lemon.

Cooking Method
Total Time: 4 hours (including chilling)
Step 1: Make the Perfect Pastry Crust (45 minutes)
Start by making your pastry crust – and don’t worry if you’re not a pastry pro! In a large bowl, whisk together the flour and salt. Add those cold butter cubes and work them in with your fingertips or a pastry cutter until the mixture looks like coarse breadcrumbs with some pea-sized butter pieces. This is where the magic happens – those butter pieces will create lovely flaky layers!
Sprinkle in the ice water one tablespoon at a time, mixing gently with a fork until the dough just comes together. Don’t overwork it – a slightly shaggy dough is exactly what we want. Wrap in plastic wrap and chill for at least 30 minutes.
Roll out your chilled dough on a floured surface and transfer to a 9-inch pie pan. Trim the edges, crimp them however makes you happy (I love a simple fork pattern), and prick the bottom all over with a fork. Pro tip: Line with parchment paper and fill with pie weights or dried beans, then bake at 425°F for 15 minutes. Remove weights and bake another 10-12 minutes until golden. This pre-baking step prevents a soggy bottom – trust me on this one!
Step 2: Create That Silky Lemon Curd (20 minutes)
While your crust cools, let’s make the star of the show – that gorgeous lemon curd! In a medium saucepan, whisk together egg yolks, sugar, lemon juice, lemon zest, and cornstarch until smooth. Don’t skip the zest – it adds incredible depth of flavor that juice alone can’t provide.
Gradually whisk in the water and place over medium heat. Here’s where patience pays off – stir constantly (and I mean constantly!) until the mixture thickens enough to coat the back of a spoon, about 8-10 minutes. It’ll seem like nothing’s happening, then suddenly it’ll start to thicken. When you can draw a line through the curd on your spoon and it holds, you’re there!
Remove from heat and immediately whisk in the butter until melted and glossy. Strain through a fine-mesh sieve if you want restaurant-level smoothness (totally worth the extra step). Pour this liquid gold into your pre-baked crust and smooth the top. Don’t worry if the surface isn’t perfect – the meringue will cover any imperfections!
Step 3: Whip Up Cloud-Like Meringue (15 minutes)
Now for the grand finale – that show-stopping meringue! Make sure your mixing bowl and beaters are completely clean (even a trace of grease will prevent proper whipping). Beat those room temperature egg whites with cream of tartar until soft peaks form.
Gradually add the sugar while continuing to beat – about one tablespoon at a time. This gradual addition is crucial for stability! Beat until you have glossy, stiff peaks that hold their shape when you lift the beaters. Fold in the vanilla extract at the very end.
Here’s the secret to preventing weeping meringue: spread it over the hot lemon filling while the filling is still warm. This helps cook the bottom of the meringue and creates a seal. Spread from the edges inward, making sure the meringue touches the crust all around – this prevents shrinking.
Step 4: The Golden Finish (12-15 minutes)
Bake at 350°F for 12-15 minutes until the meringue is golden brown and gorgeous. You’ve got this! The peaks will turn the most beautiful golden color, and your kitchen will smell like heaven.
Cool completely at room temperature (about 2 hours) before refrigerating for at least 2 hours. I know waiting is torture, but this cooling time is essential for clean, beautiful slices.
Chef’s Tips & Variations
Storage secrets: This pie is best enjoyed within 2 days of making. Store covered in the refrigerator, but bring to room temperature for about 15 minutes before serving for the best flavor and texture.
Pro tip for perfect slices: Use a sharp knife dipped in warm water and wiped clean between cuts. This prevents the meringue from sticking and tearing.
Flavor variations I love: Try adding a tablespoon of limoncello to the lemon curd for an adult twist, or fold a few drops of yellow food coloring into the curd for a more vibrant appearance. You can even make this with lime instead of lemon for a tropical variation!
Make-ahead magic: You can prepare the crust and lemon curd up to two days ahead. Just add the meringue and bake on serving day for the freshest results.
Troubleshooting: If your meringue weeps (releases liquid), it’s usually because the egg whites weren’t beaten enough or the pie wasn’t cooled properly. Don’t worry – it still tastes amazing! For future attempts, make sure those peaks are truly stiff and glossy.
Perfect pairings: This pie is absolutely divine with a cup of Earl Grey tea or a glass of sparkling wine. The bright acidity cuts through rich meals beautifully, making it perfect after heavy comfort food dinners.
Final Thoughts
There’s something deeply satisfying about creating this classic dessert from scratch. Yes, it takes a bit of time and attention, but watching faces light up when you present this beauty makes every minute worthwhile. The combination of that buttery crust, intense lemon flavor, and cloud-like meringue creates pure dessert magic.
Don’t be intimidated by the multiple components – take it one step at a time, and remember that even if it’s not picture-perfect, homemade always beats store-bought. I encourage you to give this recipe a try, especially if you’re looking to impress at your next dinner party or family gathering.
The best part? Once you’ve mastered this technique, you’ll have the confidence to tackle any meringue-topped dessert. So grab those lemons, roll up your sleeves, and get ready to create something absolutely spectacular. Your kitchen is about to become the most popular spot in the house!