
Let me tell you about the day I accidentally discovered the secret to the most ridiculously soft, pillowy breadsticks you’ve ever tasted. I was attempting to make pizza dough for dinner when I realized I was completely out of pizza sauce – typical Tuesday night chaos! Instead of panicking, I decided to shape that beautiful dough into breadsticks, and honestly? It was one of those happy kitchen accidents that turned into a family obsession.
There’s something absolutely magical about pulling apart a warm, buttery breadstick that’s so tender it practically melts in your mouth. These homemade soft breadsticks are everything you love about those fancy restaurant versions, but made right in your own kitchen with ingredients you probably already have on hand. Trust me, once you smell these babies baking, your whole house will feel like the coziest Italian bistro, and everyone will come running to the kitchen asking “what smells so incredible?”
What makes this recipe truly special is how approachable it is – no fancy equipment needed, no intimidating techniques, just good old-fashioned bread making that’ll make you feel like a total kitchen rockstar!
Table of Contents
Recipe Overview: Your New Go-To Comfort Food
These homemade soft breadsticks are the perfect combination of tender, fluffy interior and golden, slightly crispy exterior that’s brushed with aromatic garlic butter. What sets them apart from store-bought versions is their incredible texture – they’re soft enough to pull apart with your fingers, yet sturdy enough to hold up to your favorite dipping sauces.
The beauty of this recipe lies in its versatility and forgiveness. Whether you’re a bread-making newbie or someone who’s been kneading dough for years, these breadsticks are incredibly forgiving and practically foolproof. The active time is minimal – most of the work happens while the dough rises, giving you plenty of time to prep dinner or just relax.
Difficulty Level: Beginner-friendly
Total Time: 3 hours (including rise time)
Active Cooking Time: 30 minutes
Serves: 8-10 people (makes about 12 breadsticks)
Ingredients: Simple Pantry Staples for Maximum Flavor
For the Breadsticks:
- 3 cups all-purpose flour (plus extra for dusting)
- 1 packet (2¼ teaspoons) active dry yeast
- 1 tablespoon granulated sugar
- 1 teaspoon salt
- 1 cup warm water (between 100-110°F)
- 3 tablespoons olive oil
- 1 large egg (for egg wash)
For the Garlic Butter Topping:
- 4 tablespoons unsalted butter
- 3 cloves garlic, minced
- 1 teaspoon dried Italian seasoning
- ½ teaspoon garlic powder
- Coarse sea salt for sprinkling
- Fresh parsley, chopped (optional but gorgeous!)
Pro tip: When measuring flour, spoon it into your measuring cup and level it off rather than scooping directly. This prevents dense, heavy breadsticks – we want light and airy here!
The ingredient list is beautifully simple, but don’t let that fool you. Each component plays a crucial role in creating that perfect texture we’re after. The olive oil adds richness and helps create that tender crumb, while the egg wash gives us that gorgeous golden color that makes these breadsticks absolutely irresistible.
Cooking Method: Step-by-Step to Breadstick Perfection
Getting Started: Creating the Perfect Dough Base
Step 1: Wake Up That Yeast (5 minutes)
In a small bowl, combine the warm water, sugar, and yeast. Give it a gentle stir and let it sit for about 5 minutes until it gets all foamy and bubbly on top. This is called “proofing” the yeast, and it’s your guarantee that your yeast is alive and ready to work its magic! If it doesn’t foam up, your water might have been too hot (which kills yeast) or your yeast might be expired – don’t worry, it happens to the best of us!
Step 2: Build Your Dough Foundation (10 minutes)
In a large mixing bowl, combine the flour and salt. Create a little well in the center (like a flour volcano!) and pour in your foamy yeast mixture along with the olive oil. Using a wooden spoon or your hands, mix everything together until it forms a shaggy dough. Don’t worry if it looks a bit messy at this point – that’s totally normal!
Here’s where the magic starts happening: turn that shaggy dough out onto a lightly floured surface and knead for about 8-10 minutes. I know it seems like forever, but this is where we develop the gluten that gives our breadsticks their perfect chewy-yet-tender texture. The dough should go from sticky and rough to smooth and elastic. Pro tip: If your dough is sticking to everything, dust your hands and work surface with a little more flour, but don’t go overboard – we want soft breadsticks, not hockey pucks!
The Waiting Game: Let Time Do the Heavy Lifting
Step 3: First Rise – Patience Makes Perfect (1-1.5 hours)
Place your beautifully kneaded dough in a lightly oiled bowl, turning it once to coat all sides. Cover with a damp kitchen towel or plastic wrap and let it rise in a warm, draft-free spot until doubled in size. This usually takes about an hour, but don’t stress if it takes a bit longer – good bread can’t be rushed!
I like to put mine on top of the refrigerator or in the oven with just the light on (oven OFF, just the light for gentle warmth). Trust me, this rising time is when all the flavor develops, so resist the urge to peek too often – though I totally understand the temptation!
Shaping and Final Prep: Where Breadsticks Come to Life
Step 4: Shape Those Beautiful Breadsticks (15 minutes)
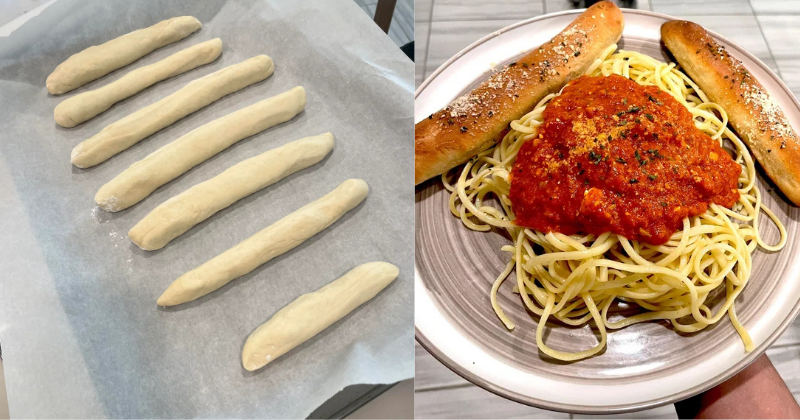
Once your dough has doubled, gently punch it down (so satisfying, right?) and turn it out onto a lightly floured surface. Roll it into a large rectangle, about 12×8 inches. Using a sharp knife or pizza cutter, cut the dough into 12 equal strips.
Here’s the fun part – gently stretch each strip to about 8 inches long and place them on a parchment-lined baking sheet, leaving about an inch between each one. They’ll puff up during the second rise, so give them room to breathe! Pro tip: If the dough springs back while you’re stretching, let it rest for 5 minutes and try again – sometimes gluten just needs a moment to relax.
Step 5: Second Rise for Ultimate Fluffiness (30-45 minutes)
Cover your shaped breadsticks with a light kitchen towel and let them rise again until puffy and almost doubled in height. This second rise is what gives us that incredibly soft, pillowy texture that makes these breadsticks absolutely irresistible.
While they’re rising, preheat your oven to 375°F and prepare your garlic butter by melting the butter with minced garlic in a small saucepan over low heat. Let those flavors meld together – your kitchen is about to smell absolutely incredible!
The Grand Finale: Baking to Golden Perfection
Step 6: The Final Touches (20 minutes)
Beat your egg with a tablespoon of water to create an egg wash, then gently brush the tops of your risen breadsticks. This is what gives them that gorgeous, glossy golden color that makes them look like they came from a fancy bakery!
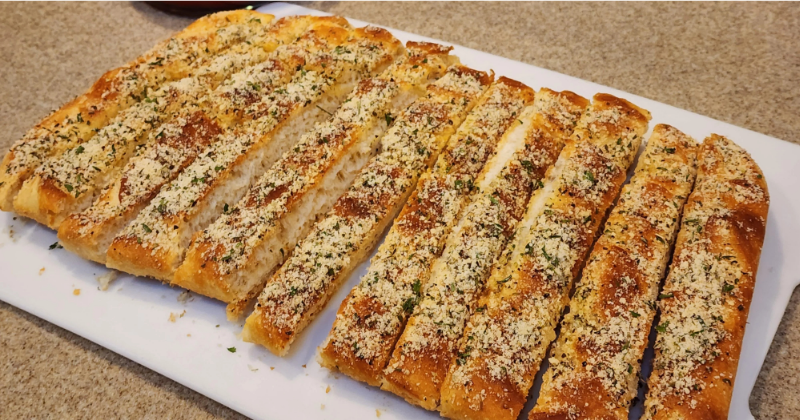
Bake for 15-18 minutes until they’re golden brown on top and sound hollow when you tap the bottom. The moment they come out of the oven, brush them generously with that aromatic garlic butter mixture and sprinkle with coarse sea salt and fresh parsley if you’re using it.
Here’s the secret: The key to restaurant-quality breadsticks is serving them warm! These are absolutely divine straight from the oven when they’re still steaming and the butter is melting into every crevice.
Chef’s Tips & Variations: Take Your Breadsticks to the Next Level
Storage and Reheating Magic: Store any leftover breadsticks (if there are any!) in an airtight container for up to 3 days. To reheat, wrap them in damp paper towels and microwave for 20-30 seconds, or pop them in a 300°F oven for 5 minutes wrapped in foil. They’ll taste almost as good as fresh!
Flavor Variations That’ll Blow Your Mind:
- Cheesy Breadsticks: Sprinkle grated Parmesan or mozzarella on top before baking
- Herb Garden: Mix fresh rosemary, thyme, or oregano into the dough
- Everything Seasoning: Top with everything bagel seasoning for a modern twist
- Sweet Cinnamon: Brush with butter and cinnamon sugar for dessert breadsticks
Make-Ahead Pro Tips: You can prepare these through the shaping stage, then cover and refrigerate overnight. Just let them come to room temperature and rise for about 45 minutes before baking. Perfect for dinner parties when you want fresh bread without the stress!
Troubleshooting Like a Pro: If your breadsticks turn out dense, your yeast might have been inactive or you may have added too much flour. If they’re too salty, reduce the salt in the dough next time – the garlic butter adds plenty of flavor! And if they’re browning too quickly, tent them with foil and reduce the oven temperature slightly.
Perfect Pairings and Serving Suggestions
These soft homemade breadsticks are incredibly versatile! They’re absolutely perfect alongside a big bowl of pasta with marinara sauce for dipping, or served with a hearty soup like minestrone or tomato basil. I love making a big batch when we’re having Italian night – they disappear faster than you can imagine!
For entertaining, set out small bowls of different dipping sauces: classic marinara, creamy alfredo, or even a simple olive oil and balsamic reduction. Your guests will think you’re a culinary genius, but we’ll keep the “how easy these actually are” secret between us!
Ready to Create Kitchen Magic?
There’s honestly nothing quite like the satisfaction of pulling apart a warm, buttery breadstick that you made completely from scratch. These homemade soft breadsticks are going to become your new go-to recipe for everything from casual family dinners to impressive dinner parties.
The best part? Once you master this basic recipe, you’ll find yourself experimenting with different flavors and toppings. Don’t be surprised if your family starts requesting these for every special occasion – they’re just that good!
So grab that apron, dust off your mixing bowls, and get ready to fill your kitchen with the most amazing aroma. Trust me, once you taste these incredible breadsticks, you’ll never want to buy the store-bought version again. You’ve absolutely got this, and your taste buds are in for such a treat!
Happy baking, and don’t forget to save me a breadstick – I’ll be right over!