
Let me tell you about the first time I ever tasted real carne guisada. I was visiting my friend Maria’s abuela in San Antonio, and the moment I stepped into her kitchen, I was hit with the most incredible aroma – tender beef simmering in a rich, deeply flavored gravy that had been bubbling away for hours. One bite of that melt-in-your-mouth beef wrapped in a warm flour tortilla, and I was completely hooked.
That was fifteen years ago, and I’ve been perfecting my own version ever since. Carne guisada – literally meaning “stewed meat” in Spanish – is pure Texas comfort food at its finest. This isn’t just any old beef stew; it’s a soul-warming dish that transforms tough cuts of meat into fork-tender perfection through slow, patient cooking and a beautiful blend of Mexican and Tex-Mex flavors.
What makes this recipe special is the way we build layers of flavor, starting with a proper sear on the beef and ending with a gravy so good you’ll want to drink it straight from the pot. Trust me, once you master this technique, you’ll have a go-to recipe that’ll become a family favorite for generations.
Table of Contents
What Makes This Carne Guisada Special
Carne guisada is the kind of dish that tells a story with every bite. Unlike regular beef stew, this Texas-Mexican hybrid uses specific techniques and seasonings that create something truly magical. We’re talking about beef so tender you can cut it with a fork, swimming in a rich, brown gravy that’s been thickened with a traditional roux and seasoned with cumin, garlic, and just the right amount of heat.
This recipe sits right in the sweet spot of comfort cooking – it’s not too complicated for weeknight cooking, but impressive enough for Sunday dinner with the family. The active cooking time is only about 30 minutes, but the slow simmering is where the magic happens. Difficulty level: Easy to medium, and totally worth every minute of that 2-hour cook time.
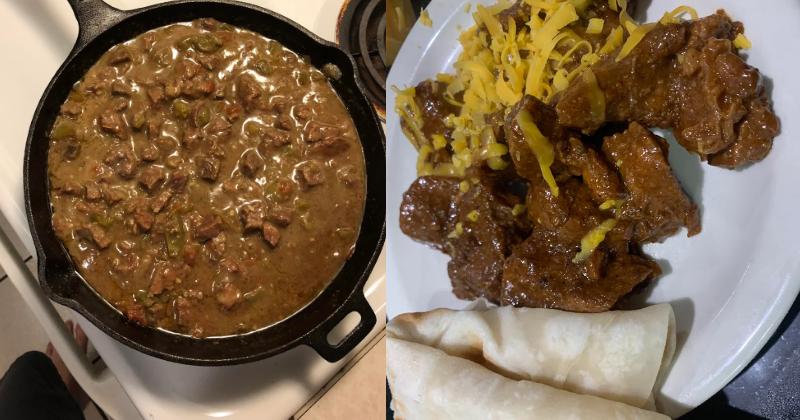
The beauty of carne guisada is its versatility. Serve it over rice, wrapped in warm tortillas, or my personal favorite – with a side of refried beans and some fresh corn tortillas for the ultimate Tex-Mex feast.
Ingredients You’ll Need
Serves 6-8 people generously
For the Beef:
- 3 lbs chuck roast or beef shoulder, cut into 1-inch cubes
- 2 tablespoons vegetable oil (or lard if you’re feeling traditional!)
- 1 teaspoon salt
- 1/2 teaspoon black pepper
For the Base:
- 1 large yellow onion, diced (about 2 cups)
- 4 cloves garlic, minced
- 2 tablespoons all-purpose flour
- 2 teaspoons ground cumin
- 1 teaspoon chili powder
- 1/2 teaspoon paprika
- 1/4 teaspoon cayenne pepper (optional, for heat lovers)
For the Liquid:
- 3 cups beef broth (homemade is amazing, but store-bought works great)
- 1 can (14.5 oz) diced tomatoes
- 2 bay leaves
- 1 jalapeño pepper, seeded and minced (keep the seeds if you like it spicy!)
Pro tip: Don’t skip the chuck roast or beef shoulder – these tougher cuts have more connective tissue that breaks down into pure, silky goodness during the long cooking process. Lean cuts like sirloin will just get tough and chewy. Trust me on this one!

Cooking Method: The Step-by-Step Journey to Perfection
Total time: 2 hours and 30 minutes Active cooking: 30 minutes
Step 1: Prep Your Beef (5 minutes)
Cut your chuck roast into uniform 1-inch cubes – and I mean it about the uniform part! This ensures everything cooks evenly. Pat the beef completely dry with paper towels, then season generously with salt and pepper. Here’s where the magic starts: letting that beef sit for about 10 minutes while you prep your other ingredients allows the seasonings to really penetrate the meat.
Step 2: The All-Important Sear (8-10 minutes)
Heat that vegetable oil in a large, heavy-bottomed Dutch oven or pot over medium-high heat. You want it nice and hot – the oil should shimmer but not smoke. Working in batches (don’t overcrowd!), sear the beef cubes on all sides until they’re beautifully browned.
This is where the magic happens – those golden-brown bits aren’t just pretty, they’re packed with flavor that’ll make your gravy absolutely incredible. Don’t rush this step! Each batch should take about 3-4 minutes. Remove the seared beef to a plate and set aside.
Step 3: Build Your Flavor Base (5 minutes)
In the same pot (don’t you dare clean it!), add your diced onions to all those beautiful browned bits. Cook for about 3-4 minutes until the onions start to soften and turn translucent. Add the minced garlic and cook for another 30 seconds until fragrant.
Pro tip: If your onions are browning too quickly, lower the heat a bit. We want them softened and sweet, not charred.
Step 4: Create the Roux (3-4 minutes)
Sprinkle the flour over your onions and garlic, stirring constantly. This is your roux – it’ll thicken your gravy and give it that beautiful, silky texture. Cook this mixture for about 2-3 minutes, stirring constantly, until it turns a light golden color. Don’t worry if it looks a little pasty at first – that’s totally normal!
Step 5: Add Your Spices (1 minute)
Add the cumin, chili powder, paprika, and cayenne (if using) to your roux. Stir everything together and cook for about 30 seconds until those spices become incredibly fragrant. Your kitchen should smell absolutely amazing right about now!
Step 6: Build Your Braising Liquid (5 minutes)
Slowly pour in your beef broth, whisking constantly to prevent lumps. Start with just a little bit and whisk until smooth, then gradually add the rest. Add your diced tomatoes (juice and all), bay leaves, and minced jalapeño.
Return that gorgeous seared beef to the pot along with any accumulated juices. Give everything a good stir and bring it to a gentle boil.
Step 7: The Long, Slow Simmer (2 hours)
This is where patience pays off! Reduce the heat to low, cover your pot, and let everything simmer gently for about 2 hours. You want just gentle bubbles breaking the surface – not a rolling boil that’ll make your beef tough.
Here’s the secret: Check on it every 30 minutes or so, giving it a gentle stir and making sure there’s enough liquid. If it’s getting too thick, add a bit more broth. If it’s too thin after 2 hours, remove the lid and let it simmer uncovered for the last 15-20 minutes.
Step 8: The Final Touch (5 minutes)
After 2 hours, your beef should be fork-tender and your gravy should be rich and thick enough to coat a spoon. Remove those bay leaves, taste for seasoning, and adjust with salt and pepper as needed.
You’ve got this! The beef is done when you can easily shred it with a fork, and the gravy should be thick enough to hold its shape on a spoon but still pourable.
Chef’s Tips & Variations That’ll Make You a Carne Guisada Legend
Storage and reheating: This stuff gets even better the next day! Store in the refrigerator for up to 4 days or freeze for up to 3 months. Reheat gently on the stovetop, adding a splash of broth if it’s gotten too thick.
Spice level variations: Love heat? Double the jalapeños or add a diced serrano pepper. Want it mild? Skip the cayenne and remove the jalapeño seeds completely. For smokiness, try adding a chipotle pepper in adobo sauce instead of the jalapeño.
Vegetable additions: Some folks love adding diced bell peppers or potatoes in the last hour of cooking. I’ve tried both, and while they’re delicious, I prefer the pure, meaty focus of the traditional version.
Serving suggestions: The classic way is with warm flour tortillas, Spanish rice, and refried beans. But don’t sleep on serving it over mashed potatoes or even with a side of cornbread for dipping in that incredible gravy.
Pro tip for busy weeknights: You can easily make this in a slow cooker! After searing the beef and building your flavor base, transfer everything to a slow cooker and cook on low for 6-8 hours or high for 3-4 hours.
Make-ahead magic: This is perfect for meal prep or entertaining. Make it a day ahead and reheat – the flavors just keep getting better and better.
Your New Favorite Comfort Food Awaits
There’s something truly special about a pot of homemade carne guisada simmering away on your stove. The way it fills your kitchen with incredible aromas, the anticipation as it slowly transforms into something amazing, and finally, that first perfect bite of tender beef and rich gravy.
This recipe has become such a staple in my home that my family asks for it at least once a month. It’s the kind of dish that brings people together around the table, creates lasting memories, and fills both bellies and hearts.
So grab your favorite Dutch oven, pour yourself a glass of something nice, and give this recipe a try. Take your time with each step, especially that searing process, and trust in the magic of slow cooking. Serve it up with warm tortillas, gather your loved ones around the table, and get ready for some seriously satisfied faces. ¡Buen provecho!