
Let me tell you about the time I showed up to my sister’s Super Bowl party with this gorgeous 7 layer bean dip, and literally everyone asked for the recipe before halftime! I’m talking about grown adults hovering around the appetizer table like moths to a flame. There’s just something magical about those perfect, colorful layers that makes people lose their minds – in the best possible way.
This isn’t just any ordinary bean dip, friends. This is the crown jewel of party appetizers – the one that looks incredibly fancy but is actually super forgiving to make. Whether you’re hosting game day, planning a potluck, or just want to treat yourself to something ridiculously delicious, this 7 layer masterpiece delivers every single time. Trust me, once you master this recipe, you’ll become that person everyone calls when they need a guaranteed crowd-pleaser!
Table of Contents
What Makes This 7 Layer Bean Dip So Special
This classic Mexican-inspired dip is pure genius in its simplicity. We’re talking about seven distinct layers of flavor and texture that come together to create something absolutely irresistible. The beauty lies in how each layer complements the others – creamy refried beans as your foundation, cool sour cream, zesty guacamole, fresh pico de gallo, melted cheese, and those perfect finishing touches.
What I love most about this recipe is how incredibly versatile it is. You can make it exactly as written, or customize each layer to match your family’s preferences. Plus, it’s one of those rare appetizers that actually looks better as people dig into it – those gorgeous layers create the most Instagram-worthy cross-section!
Difficulty Level: Beginner-friendly (seriously, if you can open cans and spread things, you’ve got this!)
Total Time: 20 minutes prep, plus chilling time
Serves: 8-12 people (or 4 people who really love their dip!)
Ingredients You’ll Need
For the Foundation Layers:
- 2 (16 oz) cans refried beans
- 1 packet taco seasoning
- 1 (16 oz) container sour cream
- 1 cup mayonnaise
- 1 packet ranch dressing mix
For the Fresh Layers:
- 3-4 ripe avocados
- 2 tablespoons fresh lime juice
- 1 teaspoon garlic powder
- Salt and pepper to taste
- 2 cups Mexican cheese blend, shredded
- 3 large tomatoes, diced
- 1 bunch green onions, chopped
- 1 (4 oz) can sliced black olives
Pro tip: The key to amazing guacamole is using perfectly ripe avocados – they should give slightly when you press them but not be mushy. If yours aren’t quite ready, pop them in a paper bag with a banana overnight!
Step-by-Step Instructions
Layer 1: The Bean Foundation
Start by mixing your refried beans with the taco seasoning in a medium bowl. This is where we build our flavor base, so don’t skip this step! Spread this mixture evenly in your serving dish – I love using a clear glass dish so everyone can see those gorgeous layers. Make sure you spread it all the way to the edges; this creates a nice seal that keeps everything fresh.
Layer 2: The Creamy Dream
In another bowl, combine the sour cream, mayonnaise, and ranch packet. Mix until it’s completely smooth – no lumps allowed! This layer is your cooling contrast to all the bold flavors, so spread it evenly over the beans. Here’s the secret: use an offset spatula or the back of a spoon to create the smoothest layer possible.
Layer 3: Perfect Guacamole
Mash those beautiful avocados with lime juice, garlic powder, salt, and pepper. Don’t overthink this – some texture is actually wonderful in guacamole! Taste and adjust the seasoning because this layer needs to shine. Spread it carefully over the sour cream mixture, and here’s a pro tip: press plastic wrap directly onto the surface of the guacamole to prevent browning if you’re making this ahead.
Layer 4: Cheese Glorious Cheese
Sprinkle that Mexican cheese blend evenly over the guacamole. This is where things start getting really exciting! The cheese creates a nice barrier and adds that irresistible melted-cheese factor when people dip their warm chips in.
Layer 5: Fresh Tomato Goodness
Dice your tomatoes and let them drain on paper towels for a few minutes – nobody wants a watery dip! Pat them dry and distribute evenly over the cheese. The key here is using tomatoes that are ripe but still firm. Those grocery store tomatoes that are perfectly red but rock-hard? Skip ’em for this recipe.
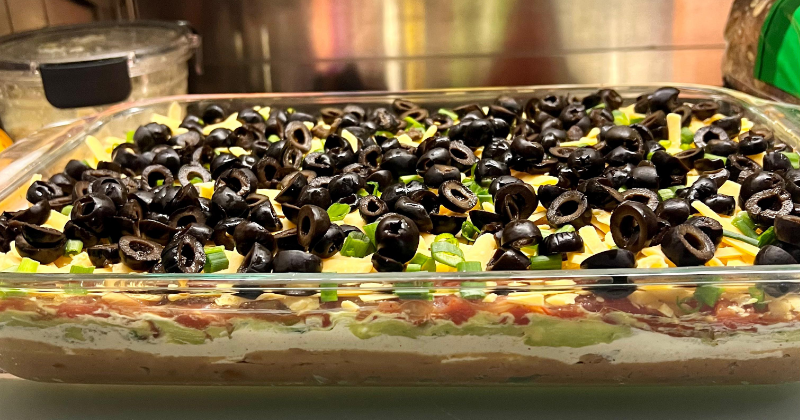
Layer 6: Green Onion Magic
Chop those green onions (both white and green parts!) and sprinkle them over the tomatoes. This layer adds the most amazing fresh, sharp flavor that cuts through all that richness. Trust me on this – don’t skip the green onions!
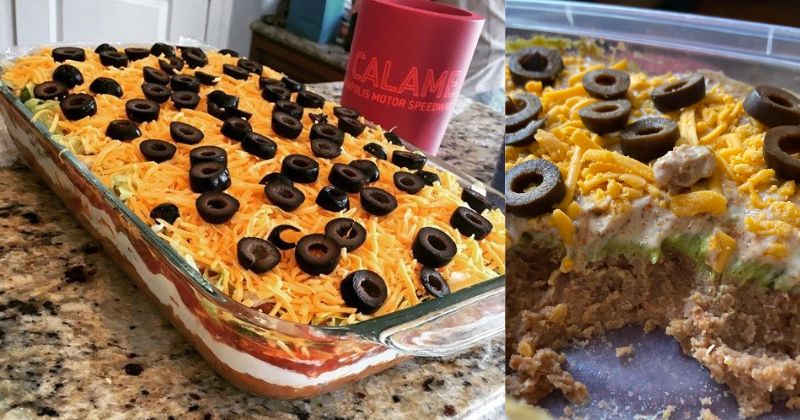
Layer 7: The Grand Finale
Top everything with those sliced black olives. Some people love them, some people… well, let’s just say they’re controversial! But they add this perfect briny pop that really completes the flavor profile. Plus, they look absolutely gorgeous as the final touch.
Chef’s Tips & Variations
Make-Ahead Magic: This dip actually gets better as it sits! You can assemble it up to 24 hours ahead – just add the tomatoes and green onions right before serving to keep them fresh and crisp.
Spice It Up: Want more heat? Add diced jalapeños to your guacamole layer, or mix some hot sauce into your sour cream mixture. I sometimes add a layer of pickled jalapeños between the cheese and tomatoes for folks who like things spicy!
Protein Power: Turn this into a more substantial meal by adding a layer of seasoned ground beef or shredded chicken between the beans and sour cream. Just make sure the meat is completely cooled before adding it.
Lightened Up Version: Use Greek yogurt instead of half the sour cream, and try reduced-fat cheese. Honestly, it’s still absolutely delicious – sometimes I prefer the tangier flavor the Greek yogurt brings!
Storage Tips: Cover tightly with plastic wrap and refrigerate for up to 3 days. The flavors actually meld beautifully overnight. Just give it a gentle stir before serving if the layers have shifted a bit.
Serving Suggestions: Serve with sturdy tortilla chips, but also consider offering sliced bell peppers, cucumber rounds, or even small flour tortillas for variety. I love setting out different types of chips – the scooped ones are perfect for getting all those layers in one bite!
Final Thoughts
There’s something so satisfying about creating this beautiful, delicious masterpiece that brings people together. Every time I make this 7 layer bean dip, I’m reminded why it’s been a party staple for decades – it’s just pure comfort food joy in dip form!
Don’t stress about making it look perfect – the beauty is in those rustic, homemade layers that show this was made with love. And here’s my favorite part: watching people’s faces light up when they take that first bite and get all seven layers in perfect harmony.
So grab your ingredients, put on some good music, and get ready to become the appetizer hero of your next gathering. This dip is about to become your secret weapon for every potluck, party, and “I need to bring something” moment. You’ve absolutely got this, and I can’t wait for you to experience the magic of homemade 7 layer bean dip!
Serve it alongside some margaritas and good friends, and you’ve got yourself the perfect recipe for an unforgettable time. Happy dipping!