
Let me tell you about the first time I tried authentic tres leches cake. I was at my friend Maria’s quinceañera, and when that first forkful hit my mouth, I literally closed my eyes and forgot where I was for a moment. The cake was impossibly moist, sweet but not cloying, and had this amazing milk-soaked texture that was unlike anything I’d ever experienced. That night, I begged Maria’s abuela for the recipe, and she laughed and said, “Mija, this cake chooses you, not the other way around.”
Well, it definitely chose me! After years of perfecting this recipe and countless kitchen experiments (some successful, some… let’s just say the dog was happy), I’m finally ready to share my foolproof version with you. This tres leches cake isn’t just dessert – it’s a celebration on a plate, a hug in cake form, and honestly, the kind of dessert that makes people remember your dinner parties forever.
What makes this recipe special is the perfect balance of that classic three-milk mixture with a sponge cake that’s sturdy enough to absorb all that creamy goodness without falling apart. Trust me, once you master this technique, you’ll be the person everyone calls when they need an show-stopping dessert!
Table of Contents
What Makes Tres Leches Cake So Special
Tres leches cake, which literally translates to “three milks cake,” is a beloved Latin American dessert that transforms a simple sponge cake into something absolutely magical. The three milks – evaporated milk, sweetened condensed milk, and heavy cream – combine to create a luscious soaking liquid that penetrates every inch of the cake.
What sets this dessert apart from other milk-soaked cakes is the incredible texture contrast. You get this tender, almost custardy interior that’s been lovingly bathed in the milk mixture, topped with a cloud of fresh whipped cream. It’s like eating a sweet, milky dream!
Difficulty Level: Intermediate (but totally doable!)
Total Time: About 4 hours (including chilling time)
Active Cooking Time: 45 minutes
Serves: 12 generous portions
Pro tip: This cake actually gets better as it sits! The flavors meld beautifully overnight, so it’s perfect for make-ahead entertaining.
Ingredients You’ll Need
For the Sponge Cake:
- 1 cup all-purpose flour
- 1½ teaspoons baking powder
- ½ teaspoon salt
- 5 large eggs, separated (room temperature is key!)
- 1 cup granulated sugar, divided
- ⅓ cup whole milk
- 1 teaspoon vanilla extract
For the Three Milk Mixture:
- 1 can (12 oz) evaporated milk
- 1 can (14 oz) sweetened condensed milk
- ½ cup heavy cream
For the Topping:
- 1½ cups heavy cream
- 3 tablespoons powdered sugar
- Ground cinnamon for dusting
Serving Size: This recipe makes one 9×13 inch cake that serves 12 people generously. Trust me, a little goes a long way with this rich, indulgent dessert!
Ingredient Tips: Room temperature eggs are absolutely crucial for getting the right texture in your sponge cake. If you forget to take them out ahead of time, place them in a bowl of warm water for about 10 minutes. Also, don’t even think about using low-fat milk products here – this is a celebration cake, and we’re going full indulgence!

Step-by-Step Cooking Method
Preparing Your Sponge Cake Foundation
Step 1: Get Your Oven Ready
Preheat your oven to 350°F and generously butter a 9×13 inch baking dish. I like to dust it with a little flour too – this ensures your cake releases beautifully. Here’s the secret: use room temperature butter for greasing. It spreads so much more evenly than cold butter!
Step 2: Mix Your Dry Ingredients
In a medium bowl, whisk together the flour, baking powder, and salt. Set this aside – we’ll need it soon, and having everything ready makes the process so much smoother.
Step 3: Create the Magic with Egg Whites
This is where things get exciting! In a large, spotlessly clean bowl, beat those egg whites until soft peaks form. Gradually add ½ cup of the sugar and keep beating until you get stiff, glossy peaks. Don’t worry if this takes a few minutes – good meringue is worth the wait! Pro tip: Even a tiny bit of grease or egg yolk will prevent your whites from whipping properly, so make sure everything is squeaky clean.
Step 4: Work with the Egg Yolks
In another bowl, beat the egg yolks with the remaining ½ cup sugar until the mixture is pale and thick – about 3 minutes. Stir in the milk and vanilla extract. The mixture should be smooth and creamy.
Step 5: Bring It All Together
Here’s where technique really matters. Gently fold the flour mixture into the egg yolk mixture, then carefully fold in the beaten egg whites in three additions. Use a light hand here – we want to keep all that beautiful air we whipped into the whites! The batter should be light and fluffy.
Step 6: Bake to Perfection
Pour the batter into your prepared pan and spread it evenly. Bake for 25-30 minutes, until the top is golden brown and a toothpick inserted in the center comes out clean. The cake should spring back lightly when touched. Don’t overbake – a slightly underdone cake actually absorbs the milk mixture better!
Creating the Three Milk Mixture
Step 7: Mix Your Three Milks
While your cake is cooling (and this is important – let it cool completely!), whisk together the evaporated milk, sweetened condensed milk, and heavy cream in a large bowl. Taste it – this mixture should be sweet but not overwhelmingly so. This is where the magic happens!
Step 8: The Soaking Process
Once your cake is completely cool, use a fork or skewer to poke holes all over the surface – about every inch or so. Don’t be shy here! These holes are going to be your milk highways. Slowly pour the three milk mixture over the entire cake, making sure it gets into all those holes.
Trust me on this: pour slowly and let the cake absorb the liquid gradually. You’ll think it’s too much liquid at first, but that sponge cake is going to drink it all up! Cover the cake and refrigerate for at least 3 hours, but overnight is even better.
The Final Touch: Whipped Cream Topping
Step 9: Whip the Perfect Topping
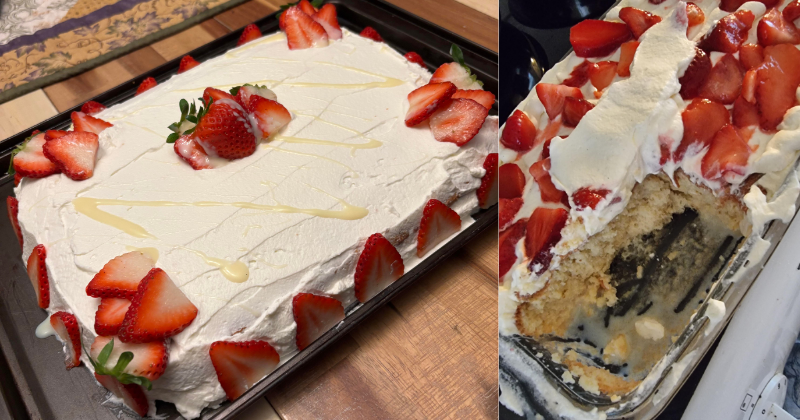
Just before serving, whip the heavy cream with powdered sugar until soft peaks form. Don’t overwhip – you want it spreadable, not chunky! Spread this gorgeous cloud of cream over your chilled cake and dust lightly with ground cinnamon.
The moment you cut into this cake and see those beautiful layers – the moist, milk-soaked sponge and the fluffy cream topping – you’ll know you’ve created something truly special.
Chef’s Tips & Variations
Pro tip #1: The key to perfect tres leches is patience. That overnight chill time isn’t just a suggestion – it’s when all the flavors meld together and create that signature custardy texture. I’ve tried shortcuts, and they just don’t deliver the same results.
Pro tip #2: Room temperature ingredients are your best friend here. Cold eggs won’t whip properly, and your cake texture will suffer. Plan ahead and take everything out about an hour before you start baking.
Flavor Variations: Want to shake things up? Try adding a tablespoon of rum or coffee liqueur to your milk mixture for an adult version. For a tropical twist, add some coconut extract to the cake batter and toast some coconut flakes for the topping. I’ve also made a chocolate version by replacing ¼ cup of flour with cocoa powder – absolutely divine!
Storage Tips: This cake keeps beautifully in the refrigerator for up to 4 days, though I doubt it’ll last that long! Keep it covered to prevent it from absorbing other flavors from your fridge. The texture actually improves over time as the milk mixture continues to work its magic.
Make-Ahead Magic: This is the perfect party dessert because it needs to be made ahead anyway. You can make the entire cake up to 2 days in advance – just add the whipped cream topping right before serving.
Serving Suggestions: Tres leches pairs beautifully with fresh berries, especially strawberries or mango slices. For special occasions, I like to serve it alongside a small cup of strong coffee or even a glass of dessert wine.
Your Tres Leches Adventure Awaits
There’s something deeply satisfying about making a dessert that looks and tastes this impressive but is actually quite forgiving. Even if your cake isn’t picture-perfect, once it’s soaked in that magical milk mixture and topped with fluffy cream, it’s going to be absolutely delicious.
I love how this cake brings people together. Every time I make it for a gathering, there’s this moment of quiet around the table as everyone takes their first bite. Then the compliments start flowing, and someone inevitably asks for the recipe. That’s when you know you’ve made something truly special.
Don’t be intimidated by the technique – yes, there are several steps, but none of them are particularly difficult. The worst thing that can happen is you end up with a slightly imperfect cake that still tastes incredible. You’ve got this! And remember, like Maria’s abuela told me all those years ago, sometimes the cake chooses you. Let this tres leches cake choose you, and I promise you’ll have a new signature dessert that’ll make you the star of every potluck, birthday party, and family gathering.
So grab your ingredients, put on some good music, and get ready to create some serious dessert magic. Your taste buds (and your dinner guests) will thank you!