
There’s something absolutely magical about watching fresh pasta take shape under your hands. I’ll never forget the first time my Italian neighbor, Nonna Maria, taught me how to make cavatelli in her tiny kitchen. She rolled out the dough with such practiced ease, her weathered hands moving like a dancer’s, creating these beautiful little shells that would soon cradle her famous Sunday sauce. “Pasta is love made edible,” she’d say with a knowing smile, flour dusting her apron.
That memory comes flooding back every time I make homemade cavatelli, and trust me, once you experience the satisfaction of creating these tender, chewy little pockets of perfection, you’ll understand why this humble pasta has captured hearts across Italy for generations. Today, I’m sharing everything I’ve learned about making authentic cavatelli from scratch – and don’t worry, it’s much easier than you might think!
Table of Contents
What Makes Cavatelli So Special?
Cavatelli (pronounced “kah-vah-TELL-ee”) is a rustic, hand-rolled pasta that originates from the southern regions of Italy, particularly Puglia and Molise. The name literally means “little hollows,” which perfectly describes these charming shell-shaped pasta pieces. What sets cavatelli apart from other pasta shapes is its unique texture and incredible sauce-holding ability.
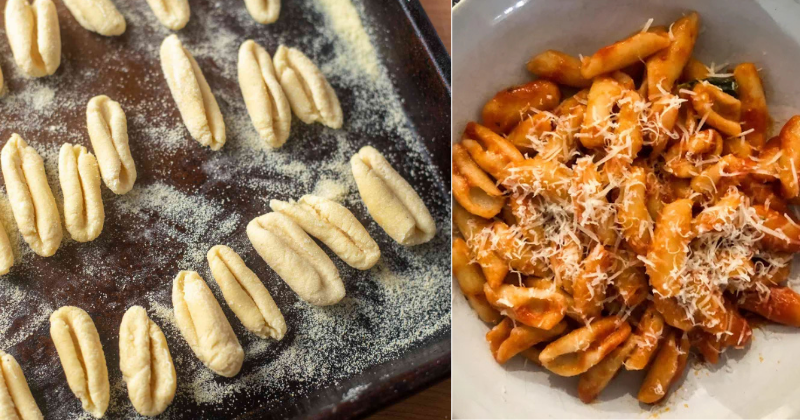
Unlike store-bought pasta, homemade cavatelli has a delightfully chewy texture with a slightly irregular, rustic appearance that screams homemade comfort food. The gentle curves and ridges created by hand-rolling make it absolutely perfect for catching and holding onto chunky sauces, pesto, or simple olive oil preparations.
Difficulty Level: Beginner-friendly (seriously!)
Active Time: 45 minutes
Total Time: 1 hour 15 minutes (including resting time)
Serves: 4-6 people
Ingredients for Perfect Homemade Cavatelli
Here’s everything you’ll need to create pasta magic in your kitchen:
For the Pasta:
- 2 cups (240g) all-purpose flour, plus extra for dusting
- 3/4 cup warm water
- 1/2 teaspoon fine sea salt
- 1 tablespoon extra virgin olive oil (optional, but I love what it adds)
Ingredient Tips That Make All the Difference:
Pro tip: The quality of your flour matters! I prefer using “00” Italian flour when I can find it, but regular all-purpose flour works beautifully too. The key is consistency in your measurements – I always weigh my flour for the most reliable results.
The water temperature is crucial here. You want it warm to the touch but not hot – think baby bottle warm. This helps activate the gluten gently and makes the dough easier to work with. Trust me on this one!
Serving Size: This recipe generously serves 4-6 people as a main course, or 6-8 as a starter. I always make extra because fresh cavatelli freezes like a dream, and future-you will thank present-you for the meal prep win!

Step-by-Step Cavatelli Making Method
Creating the Perfect Dough
Step 1: Mix the Foundation In a large mixing bowl, whisk together the flour and salt. Create a well in the center – think of it as a cozy little crater for your liquids. Pour the warm water and olive oil into this well. Using a fork, gradually incorporate the flour into the liquid, starting from the inner edges and working outward.
Here’s where patience pays off: don’t rush this process! The dough will look shaggy and rough at first, and that’s perfectly normal. Keep mixing until it comes together into a rough ball.
Step 2: The Therapeutic Kneading Process Turn the dough onto a lightly floured surface and knead for 8-10 minutes. This is where the magic happens! The dough will transform from rough and sticky to smooth and elastic. I love this part – it’s incredibly meditative, and you can literally feel the gluten developing under your hands.
Pro tip: If the dough feels too sticky, add flour one tablespoon at a time. If it’s too dry, wet your hands slightly and continue kneading. The perfect cavatelli dough should feel smooth, pliable, and just slightly tacky to the touch.
Step 3: The Essential Rest Wrap your beautiful dough ball in plastic wrap or place it under a damp kitchen towel. Let it rest for 30 minutes at room temperature. This resting time is crucial – it allows the gluten to relax, making the dough much easier to roll and shape. Don’t skip this step; I learned that lesson the hard way!
Shaping Your Cavatelli
Step 4: Prep Your Workspace While your dough rests, prepare your shaping station. Lightly flour a large baking sheet for the finished cavatelli and dust your work surface. Have a clean kitchen towel ready to cover the shaped pasta as you work.
Step 5: The Rolling Technique Divide the rested dough into 6-8 portions. Keep the pieces you’re not working with covered to prevent drying. Take one portion and roll it into a rope about 1/2 inch thick. Don’t worry about perfection – the rustic, handmade look is part of cavatelli’s charm!
Cut this rope into 1/2-inch pieces. Now comes the fun part: the signature cavatelli roll!
Step 6: Creating the Classic Shape Here’s the secret technique Nonna Maria taught me: Place each piece of dough in front of you. Using the tips of your index and middle fingers, gently press down and drag the dough toward you while applying light pressure. The dough will naturally curl and create that beautiful hollow shell shape.
Pro tip: If you’re having trouble getting the hang of it, try using the back of a butter knife or a gnocchi board. Some people even use the tines of a fork! The goal is to create ridges and a slight curl that will hold sauce beautifully.
Step 7: The Assembly Line Work in batches, keeping shaped cavatelli on the floured baking sheet in a single layer. Make sure they’re not touching, or they’ll stick together – learned that one the hard way during my first attempt!
Cooking Your Homemade Cavatelli
Step 8: The Perfect Cook Bring a large pot of generously salted water to a rolling boil. The water should taste like the sea – this is where your pasta gets its foundational flavor.
Fresh cavatelli cooks quickly! Drop them into the boiling water and stir gently to prevent sticking. They’re done when they float to the surface, usually 2-4 minutes. Taste one to check – it should be tender but still have a pleasant bite.
Pro tip: Save a cup of that starchy pasta water before draining! It’s liquid gold for binding sauces and achieving silky perfection.
Chef’s Tips & Delicious Variations
Storage Secrets: Fresh cavatelli can be stored in the refrigerator for up to 2 days on a floured baking sheet, covered with a damp towel. For longer storage, freeze them in a single layer on the baking sheet, then transfer to freezer bags once solid. They’ll keep for up to 3 months and can be cooked directly from frozen – just add an extra minute or two to the cooking time.
Flavor Variations to Try:
- Spinach Cavatelli: Add 1/2 cup of finely chopped, squeezed-dry cooked spinach to the dough for a beautiful green color and subtle earthy flavor
- Herb-Infused: Mix in 2 tablespoons of finely chopped fresh herbs like basil, oregano, or parsley
- Whole Wheat: Substitute half the all-purpose flour with whole wheat flour for a nuttier flavor and added nutrition
Perfect Sauce Pairings: Cavatelli’s sturdy texture and sauce-catching curves make it perfect for hearty preparations. Try it with:
- Classic tomato and basil sauce with fresh mozzarella
- Spicy sausage and broccoli rabe
- Simple garlic, olive oil, and red pepper flakes
- Creamy mushroom and pancetta sauce
- Fresh pesto with cherry tomatoes
Troubleshooting Tips: Don’t worry if your first batch isn’t perfect – pasta making is an art that improves with practice! If your cavatelli are falling apart, the dough might be too wet. If they’re cracking, it’s likely too dry. The beauty of homemade pasta is that even the “imperfect” pieces taste absolutely incredible.
Your Cavatelli Adventure Awaits
Making homemade cavatelli is more than just preparing dinner – it’s connecting with centuries of Italian tradition and creating something beautiful with your own hands. Every time I roll out that dough and shape each little shell, I’m transported back to Nonna Maria’s kitchen, surrounded by the warmth of good food and even better company.
The first bite of your homemade cavatelli will be a revelation. The texture is incomparable to store-bought pasta – chewy yet tender, with a rustic charm that only comes from handmade food. Whether you’re making this for a special occasion or a cozy weeknight dinner, your family and friends will be absolutely amazed by what you’ve created.
So grab your apron, dust off that rolling pin, and dive into this wonderful world of pasta making. Trust me, once you’ve experienced the joy of homemade cavatelli, you’ll find yourself making it again and again. After all, as Nonna Maria always said, “Pasta is love made edible” – and there’s no better way to show your love than with something made by your own hands.
Buon appetito, my fellow pasta lovers! I can’t wait for you to experience the magic of homemade cavatelli.