
I’ll never forget the first time I made strawberry tartlets for my mom’s birthday dinner. I was so nervous about getting the pastry cream just right, but when I saw everyone’s faces light up at that first bite – the buttery, flaky crust giving way to silky vanilla cream and those perfectly sweet strawberries – I knew I’d discovered something special. These little gems have become my go-to dessert whenever I want to impress, and honestly, they’re way easier than they look!
What makes these strawberry tartlets absolutely irresistible is the perfect balance of textures and flavors. You’ve got that crisp, golden pastry shell that practically melts in your mouth, paired with rich vanilla pastry cream that’s smooth as silk, all topped with fresh, juicy strawberries that burst with summer sweetness. Trust me, once you master this recipe, you’ll be the dessert hero at every gathering!
Table of Contents
What Makes These Strawberry Tartlets Special
These aren’t just any ordinary strawberry tartlets – they’re a masterclass in French pastry technique made accessible for home bakers. The secret lies in the combination of a perfectly crisp pâte sucrée (sweet pastry dough), silky homemade pastry cream, and the freshest strawberries you can find.
Difficulty Level: Intermediate (but totally doable!) Total Time: About 3 hours (including chilling time) Active Cooking Time: 90 minutes Serves: 8 individual tartlets
What sets these apart from store-bought versions is the attention to detail. We’re talking about blind-baking the shells to achieve that perfect golden crunch, making pastry cream from scratch (it’s easier than you think!), and arranging those strawberries like little edible roses. The result? Bakery-quality tartlets that’ll have everyone asking for your secret!
Ingredients
For the Sweet Pastry Shells:
- 1¼ cups all-purpose flour
- ⅓ cup powdered sugar
- ¼ teaspoon salt
- 6 tablespoons cold unsalted butter, cubed
- 1 large egg yolk
- 2-3 tablespoons ice water
For the Vanilla Pastry Cream:
- 2 cups whole milk
- 6 large egg yolks
- ½ cup granulated sugar
- ⅓ cup cornstarch
- 4 tablespoons unsalted butter
- 2 teaspoons pure vanilla extract
- Pinch of salt
For the Topping:
- 2 pounds fresh strawberries, hulled and sliced
- 3 tablespoons apricot jam or jelly
- 1 tablespoon water
Pro tip: Choose strawberries that are bright red, fragrant, and slightly firm – they’ll hold their shape beautifully and taste amazing. Avoid any that are overly soft or have white shoulders, as they won’t be as sweet.
 (800 x 420 px)")
Cooking Method
Making the Pastry Shells (45 minutes)
- Prepare the dough: In a large bowl, whisk together flour, powdered sugar, and salt. Add the cold butter cubes and use your fingertips to rub the butter into the flour until it resembles coarse breadcrumbs. This is where the magic starts happening – those little butter pieces will create the flaky texture we’re after!
- Bring it together: Create a well in the center and add the egg yolk plus 2 tablespoons of ice water. Gently mix with a fork until the dough just starts to come together. If it seems too dry, add that extra tablespoon of water. Don’t worry if it looks a bit shaggy – that’s perfect!
- Shape and chill: Turn the dough onto a lightly floured surface and gently knead it just 2-3 times until it forms a smooth ball. Flatten into a disk, wrap in plastic wrap, and refrigerate for at least 1 hour. Trust me, this chilling step is crucial for workable dough!
- Roll and shape: Remove dough from fridge and let it sit for 5 minutes to soften slightly. On a floured surface, roll to about ⅛-inch thickness. Cut circles slightly larger than your tartlet pans (about 4-5 inches for 3-inch pans). Gently press into your tartlet pans, trimming excess and crimping edges.
- Blind bake: Preheat oven to 375°F. Line each shell with parchment and fill with pie weights or dried beans. Bake for 12 minutes, then remove weights and parchment. Bake another 8-10 minutes until golden brown. Here’s the secret – they should sound slightly hollow when tapped. Let cool completely.
Creating the Pastry Cream (30 minutes)
- Heat the milk: In a medium saucepan, heat milk over medium heat until it just begins to steam and small bubbles form around the edges. Don’t let it boil – we want it hot but gentle.
- Whisk the base: While milk heats, whisk egg yolks and sugar in a large bowl until pale yellow and thick. Add cornstarch and whisk until completely smooth. This is where patience pays off – no lumps allowed!
- Temper the eggs: Here’s where the magic happens! Slowly pour about ½ cup of the hot milk into the egg mixture, whisking constantly. This prevents the eggs from scrambling. Gradually add the rest of the milk, whisking continuously.
- Cook to perfection: Pour the mixture back into the saucepan and cook over medium heat, whisking constantly, until it thickens and bubbles. This usually takes 2-3 minutes. Don’t worry if it seems to thicken suddenly – that’s exactly what we want!
- Finish with butter and vanilla: Remove from heat and immediately whisk in butter, vanilla, and salt until smooth and glossy. Press plastic wrap directly onto the surface to prevent a skin from forming, and refrigerate until completely cool.
Assembly Time (15 minutes)
- Fill the shells: Spoon or pipe the chilled pastry cream into each cooled tartlet shell, filling them about ¾ full. I like to use a piping bag for a professional look, but a spoon works perfectly too!
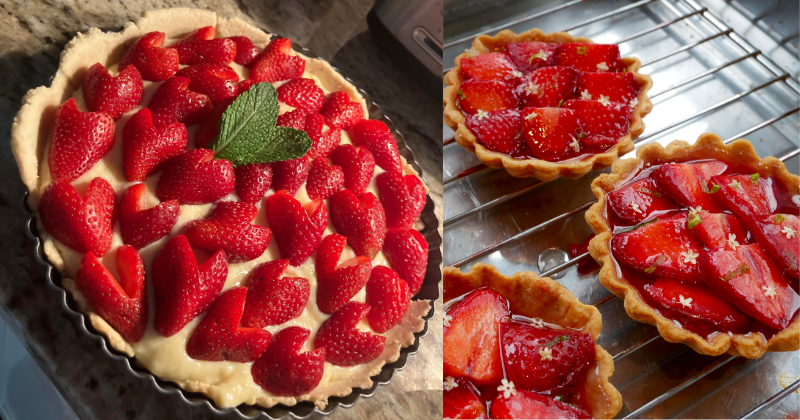
- Arrange the strawberries: Now for the fun part! Arrange sliced strawberries in overlapping circles, starting from the outside and working in. I love creating a rose pattern – it looks so elegant and impressive.
- Create the glaze: In a small saucepan, heat apricot jam with 1 tablespoon water until melted. Strain to remove any chunks, then gently brush over the strawberries for that beautiful, glossy finish.
Chef’s Tips & Variations
Storage secrets: These tartlets are best enjoyed the day they’re made, but you can prepare components ahead. The pastry shells keep covered for 2 days, and pastry cream lasts 3 days refrigerated. Just assemble on serving day for the crispest results.
Flavor variations: Try substituting the vanilla in the pastry cream with almond extract, lemon zest, or even a splash of Grand Marnier for an adult twist. I’ve also made these with mixed berries – blueberries and raspberries look absolutely stunning alongside the strawberries!
Pro tip for perfect pastry cream: If your pastry cream develops lumps (it happens to the best of us!), simply strain it through a fine-mesh sieve while it’s still warm. It’ll become silky smooth again.
Make-ahead strategy: You can prepare the pastry shells up to a week ahead and freeze them. Just thaw at room temperature and re-crisp in a 300°F oven for 5 minutes before filling.
Seasonal substitutions: When strawberries aren’t in season, try fresh raspberries, sliced peaches, or even tropical fruits like kiwi and mango. The pastry cream base works beautifully with any fruit!
Equipment tip: If you don’t have individual tartlet pans, you can make this as one large 9-inch tart – just adjust the baking time to about 20-25 minutes for the shell.
Final Thoughts
There’s something so satisfying about creating these beautiful strawberry tartlets from scratch. Sure, they take a bit of time and love, but every step is worth it when you see those gorgeous results. The combination of textures – that crisp shell, silky cream, and fresh fruit – creates a dessert that’s both elegant and comforting.
These tartlets are perfect for spring brunches, summer garden parties, or anytime you want to treat yourself and your loved ones to something special. I love serving them with a cup of coffee or a glass of sparkling wine – the bubbles complement the sweet strawberries beautifully.
Don’t be intimidated if you’re new to pastry making. Take your time, follow the steps, and remember that even if they’re not picture-perfect, they’ll still taste absolutely divine. After all, the best part about homemade desserts is the love that goes into every bite. So go ahead, give these strawberry tartlets a try – I promise they’ll become one of your signature desserts too!