
Let me tell you about the day I first discovered milk bread – or as it’s known in Japan, shokupan. I was wandering through a Japanese bakery in my neighborhood, completely mesmerized by the most incredibly soft, pillowy loaves I’d ever seen. The baker let me sample a piece, and I swear I nearly cried. It was like eating a cloud that had been blessed by butter angels. That moment changed my entire relationship with homemade bread.
After months of trial and error (and let’s be honest, a few spectacular failures), I finally cracked the code to making authentic milk bread at home. This isn’t just any ordinary bread – it’s the kind that stays soft for days, tears apart in the most satisfying way, and makes even the simplest peanut butter sandwich feel like a gourmet experience. Trust me when I say this recipe will become your new obsession.
Table of Contents
What Makes Milk Bread So Special?
Milk bread is unlike any other bread you’ve probably made before. The secret lies in a technique called tangzhong – a flour and liquid roux that’s cooked before being added to the dough. This Japanese method creates an incredibly soft, fluffy texture that stays fresh longer than traditional bread.
What sets this bread apart is its tender crumb, slightly sweet flavor, and that signature pull-apart quality that makes it perfect for everything from French toast to simple buttered slices. The milk bread texture is so distinctive – it’s bouncy, almost marshmallow-like, yet substantial enough to hold up to sandwiches and spreads.
Difficulty Level: Intermediate (don’t let this scare you – I’ll walk you through every step!)
Total Time: About 4-5 hours (including rising time)
Active Time: 30 minutes
Serves: Makes 1 standard loaf (about 12 slices)
Ingredients You’ll Need
For the Tangzhong (Roux):
- 3 tablespoons bread flour (or all-purpose flour)
- 1/2 cup whole milk
- 2 tablespoons water
For the Bread Dough:
- 2 1/2 cups bread flour (plus extra for dusting)
- 1/4 cup granulated sugar
- 1 teaspoon active dry yeast
- 1 teaspoon salt
- 1 large egg (room temperature)
- 1/2 cup whole milk (warmed to about 110°F)
- 3 tablespoons unsalted butter (softened)
- Tangzhong (from above)
For the Egg Wash:
- 1 egg yolk
- 1 tablespoon milk
Pro tip: Room temperature ingredients are crucial for this recipe. Take your egg and butter out about an hour before you start baking. Cold ingredients can shock the yeast and affect your bread’s rise.

Step-by-Step Instructions
Step 1: Make the Tangzhong
This is where the magic begins! In a small saucepan, whisk together the 3 tablespoons of flour, 1/2 cup milk, and 2 tablespoons water until completely smooth. No lumps allowed here – trust me on this one.
Place the saucepan over medium-low heat and whisk constantly. You’ll notice the mixture starting to thicken after about 2-3 minutes. Keep whisking until it reaches the consistency of thick pudding and leaves lines when you drag your whisk through it. This usually takes about 3-5 minutes total.
Transfer the tangzhong to a small bowl and cover it directly with plastic wrap (press the wrap right onto the surface to prevent a skin from forming). Let it cool to room temperature while you prepare the rest of your ingredients.
Step 2: Prepare the Dough
In a large mixing bowl, whisk together the bread flour, sugar, yeast, and salt. Make sure to keep the salt and yeast on opposite sides of the bowl – salt can kill yeast if they come into direct contact before mixing.
Create a well in the center of your dry ingredients. Add the beaten egg, warm milk, cooled tangzhong, and softened butter. Here’s where things get interesting – the dough will look like a shaggy, sticky mess at first. Don’t panic! This is exactly what we want.
Step 3: Knead the Dough
Now comes the fun part – kneading! You can do this by hand or with a stand mixer fitted with a dough hook. If you’re doing it by hand (which I actually prefer for this recipe), turn the dough onto a lightly floured surface.
Knead for about 10-12 minutes by hand or 6-8 minutes with a mixer until the dough becomes smooth, elastic, and slightly tacky but not sticky. The milk bread dough should be soft and pliable – it’s ready when you can stretch a small piece thin enough to see light through it without tearing.
Pro tip: If the dough feels too sticky, resist the urge to add too much extra flour. A bench scraper is your best friend here – use it to help manipulate the dough during the first few minutes of kneading.
Step 4: First Rise
Shape your dough into a smooth ball and place it in a lightly oiled bowl. Cover with a damp kitchen towel or plastic wrap and let it rise in a warm, draft-free place for about 1-1.5 hours, or until doubled in size.
Here’s the secret: I like to place my bowl on top of the refrigerator or in the oven with just the light on. The gentle warmth helps create the perfect rising environment.
Step 5: Shape the Loaf
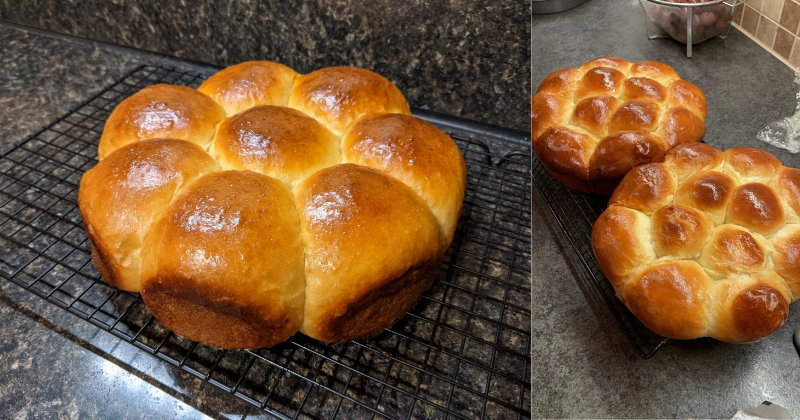
Once your dough has doubled, gently punch it down to release the air. Turn it out onto a lightly floured surface and divide it into 3 equal pieces. This is where you can get creative with shaping!
For a classic milk bread loaf, roll each piece into a rectangle, then roll it up like a jelly roll. Place all three rolls seam-side down in a greased 9×5-inch loaf pan. The rolls should be touching but not squished together.
Step 6: Second Rise
Cover your shaped loaf with a damp towel and let it rise for another 45-60 minutes, until the dough crowns above the rim of the pan. This second rise is crucial for that signature fluffy texture.
Step 7: Bake to Perfection
Preheat your oven to 350°F during the last 15 minutes of the second rise. Whisk together the egg yolk and milk for your egg wash and gently brush it over the top of the loaf. This gives you that beautiful golden-brown color.
Bake for 30-35 minutes, until the top is golden brown and the internal temperature reaches 190°F. If the top starts browning too quickly, tent it with aluminum foil.
Trust me on this: The smell alone will drive you crazy, but resist the urge to slice into it immediately!
Step 8: Cool and Enjoy
Remove the bread from the oven and let it cool in the pan for 10 minutes before turning it out onto a wire rack. This cooling time is essential – cutting too early will result in a gummy texture.
Once completely cool (I know, the waiting is torture), slice and prepare to be amazed by the soft, pillowy texture of your homemade milk bread.
Chef’s Tips & Variations
Storage secrets: This milk bread stays soft for up to 4 days when stored in an airtight container or bread bag. For longer storage, slice and freeze for up to 3 months. Toast directly from frozen – it’s incredible!
Flavor variations: Try adding a tablespoon of honey to the dough for extra sweetness, or experiment with different extracts like vanilla or almond. I’ve also made versions with matcha powder and black sesame seeds that were absolutely divine.
Troubleshooting tips: If your bread didn’t rise properly, check your yeast expiration date and water temperature. Too hot water kills yeast, while too cool water won’t activate it. The ideal temperature feels just slightly warm on your wrist.
Pro tip for perfect slicing: Use a sharp serrated knife and saw gently rather than pressing down. This preserves that beautiful fluffy texture.
Serving suggestions: This bread is incredible for French toast, makes the ultimate grilled cheese, and is perfect for Asian-style milk bread sandwiches with ingredients like egg salad, katsu, or even simple butter and jam.
Make-ahead option: You can prepare the dough through the first rise, then refrigerate overnight. Let it come to room temperature before shaping and proceeding with the second rise.
Final Thoughts
Making homemade milk bread might seem intimidating at first, but I promise you – once you master this technique, you’ll never want to buy store-bought bread again. There’s something incredibly satisfying about pulling apart those soft, pillowy layers and knowing you created this masterpiece with your own hands.
The tangzhong method might be new to you, but it’s a game-changer that’s worth learning. This technique doesn’t just work for milk bread – you can apply it to dinner rolls, burger buns, and other enriched breads for that same incredible texture.
So grab your apron, clear your afternoon, and get ready to fall in love with the most heavenly bread you’ll ever make. Your kitchen will smell amazing, your family will think you’re a wizard, and you’ll have the satisfaction of mastering an authentic technique that’s been perfected over generations.
What are you waiting for? Let’s make some magic happen in your kitchen! And when you tear into that first warm, buttery slice, think of me – I’ll be cheering you on from wherever I am, probably making another loaf myself.